A common problem with Salesforce Developer Sandboxes is that they are blank. Really you're going to want some data in there, so there are various strategies for copying data from your live instance to the Sandbox.
There are some paid-for solutions - SFXOrgData, Salesforce Partial Data Sandboxes - but if you've got a decent ETL tool you can build your own.
There are a bunch of free ETL tools for Salesforce:
- JitterBit Data Loader is good for quick ad-hoc tasks but the free version makes it difficult to manage specific ETL projects or share projects with other users
- Pentaho Community Edition - an open source edition of the enterprise version
- Apatar was a free open source Salesforce ETL which still works but development seems to have stopped since 2011
- TalenD Open Studio is an open source ETL tool
For the task of copying data from live to a Sandbox, either Pentaho or TalenD Open Studio could be used, depending on preference. Here's a good comparison of the differences between them. For the purposes of this blog post, I'm going to concentrate on TalenD.
Introducing TalenD

TalenD is an open source ETL tool based on the Eclipse IDE. It has a multitude of features and connectors, which makes it very useful.
And, not to beat about the bush, it also makes it very big and potentially confusing. Its one of those really really big Java programs that has that ... well, "Java" sort of look to them. It has good Salesforce support but its not built for Salesforce specifically which means that there are some idiosyncracies in the way it handles custom objects for example.
But, on the plus side, it works, its pretty fast with data, its properly open-source and it has a fairly big community of users.
You can download it here. The installer is 429 MB. Yes, thats right, nearly half a gig. Half a gigabyte of Java desktop. I blame Eclipse. Anyway, lets run through getting it working with Salesforce ...
(NB: On my machine (64-bit Windows 8), the TalenD installer did not create any shortcuts to start TalenD. There were a bunch of differene EXEs in the "C:\Program Files (x86)\TalenD\TOS_DI-Win32-r111943-V5.4.1" folder. The "TOS_DI-win32-x86.exe" worked for me.)
Our Mission
In this example we want to transfer a subset of the Contacts from our Live site to our Sandbox. Its a subset because the Developer sandboxes have a limited amount of space.
We also have a picklist/lookup table called 'Animal' (thats a custom object, obviously) - we want to transfer all of those Animal records.
In our example, each Contact can have one or many 'Pet' records. We want to transfer all of the Pet records that belong to our subset of Contacts.
Note that Pet has a foreign key to both Contact and Animal - handling foreign keys when moving data to Salesforce Sandboxes is a bit of a challenge so thats why our example has two of them.

Note that we are not transferring Accounts, just Contacts, to make this example easier. In my particular case, the underlying Salesforce Instance has the Salesforce Non-Profit Starter Pack (SPSP) which uses some tricks to make the Contact -> Account relationship less important (it automatically generates an Account for each Contact for you). In a regular Salesforce inastance, not setting the Account for a Contact is allowed but will lead to it being a 'Private Contact' only visible to its owner. For this example, that'll have to do. If you need to transfer Accounts as well in your scenario, it should be fairly clear how to extend this example to allow that.
Here are the object definitions and example data used for the Animal__c and Pet__c custom objects, if you want to see exactly what this example will be working with:
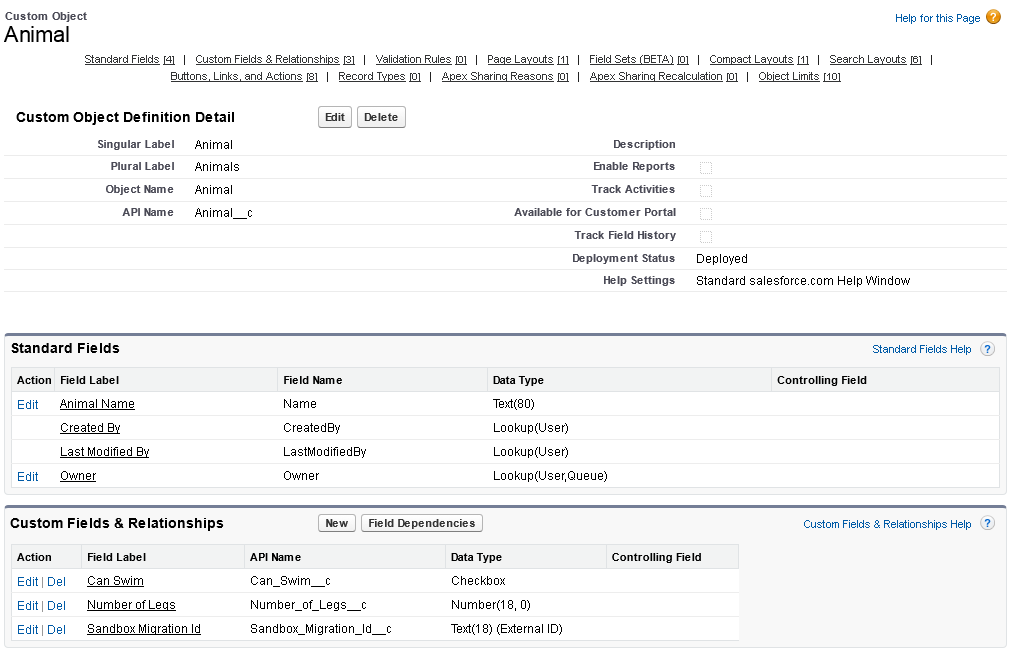

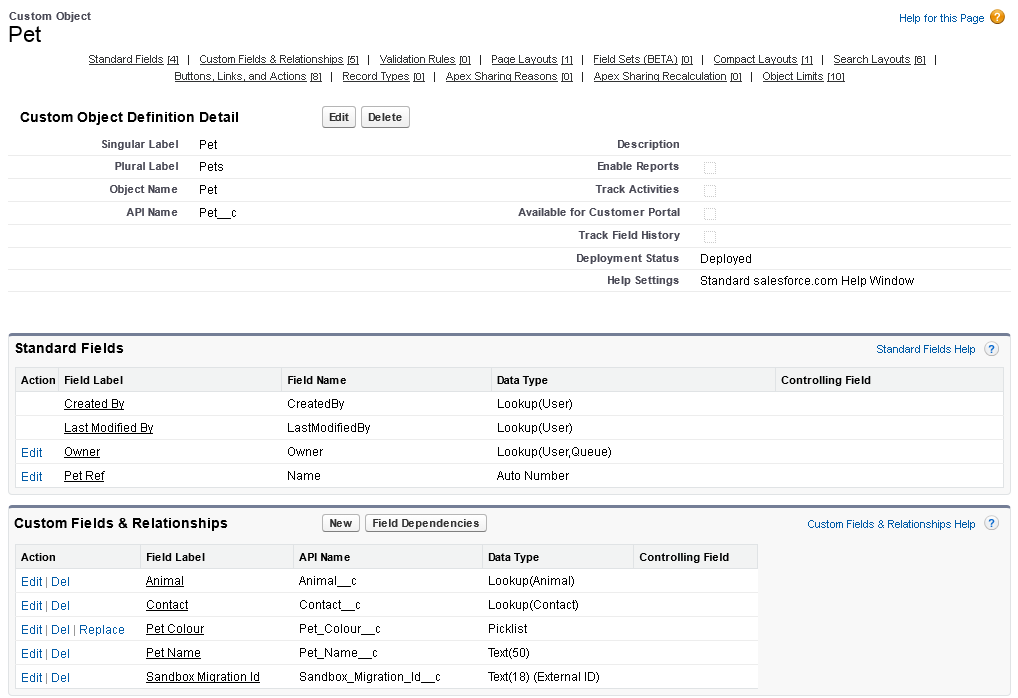

The Contact object in this example is the usual Contact object. One custom field has been added - Sandbox_Migration_Id__c, the significance of which will be explained below. For this example we will only be transferring contacts with a LastName matching 'Testperson' (as show in Pet list above).
Creating a Project and Job
When TalenD starts, it asks you to create an initial Project. Press the Adanced button and you'll get a few more options, like this:
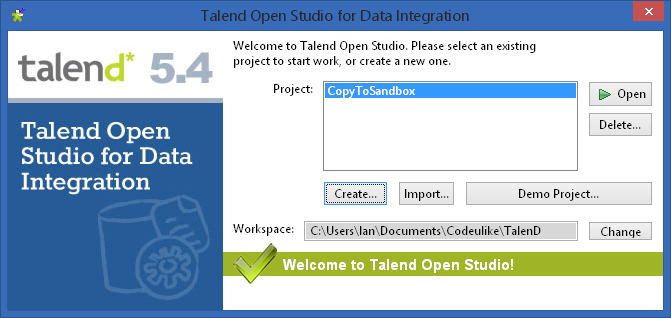
Note that TalenD uses a master 'Workspace' area - this is your chance to change it to something else. Then press Create ... and give your Project a name. I went for "CopyToSandbox". Then select it and press Open...
You might get asked here to sign up to the TalendForge community. I'm sure its lovely, but lets press the Skip button for now...
You then get a TalenD welcome screen which gives you the chance to catch up on the latest ... er ... TalenD news. Select the "Create a new Job ..." option, or just press "Start Now" and right click on 'job designs' to create a new Job.
Lets call the Job "CopyToSandboxJob". You should then end up with something looking like this:
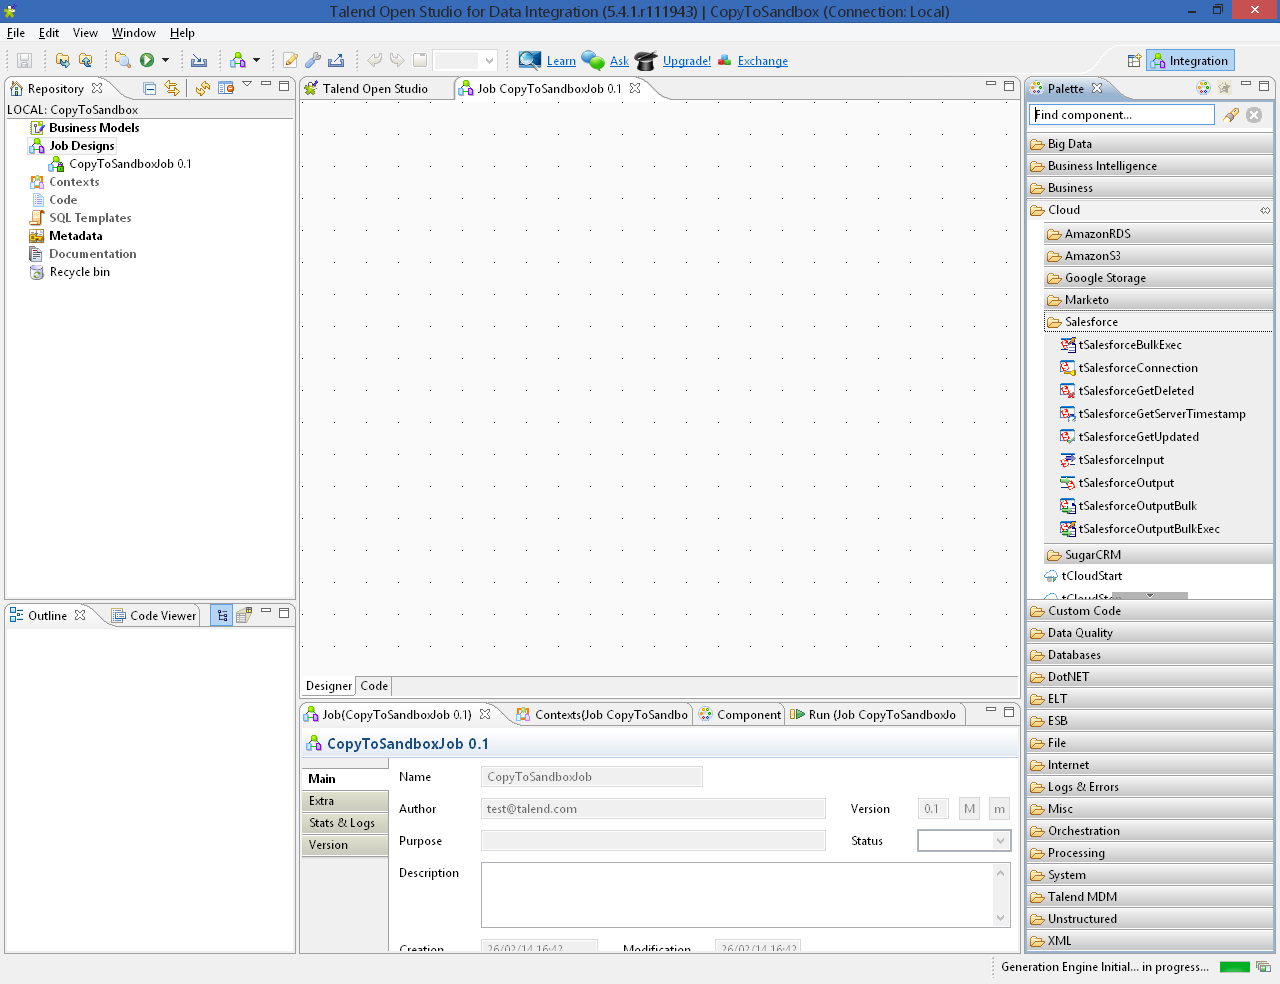
On the left you have a Job called "CopyToSandboxJob 0.1" under "Job Designs". On the right you have a bazzillion different components to use (we're going to use exactly 4 of them). In the middle is the blank slate where we're going to wire-up our job. At the bottom is a mutli-tab Properties box type area where most of the fiddling around will happen.
Connections and Meta-data
First we need to define connections for our Source and Target Salesforce instances:
- From the Palette on the right, go to Cloud -> Salesforce and drag a tSalesforceConnection component onto the central canvas ('designer')
- Double click on the component and then the 'Component' tab at the bottom of the screen will show its properties:
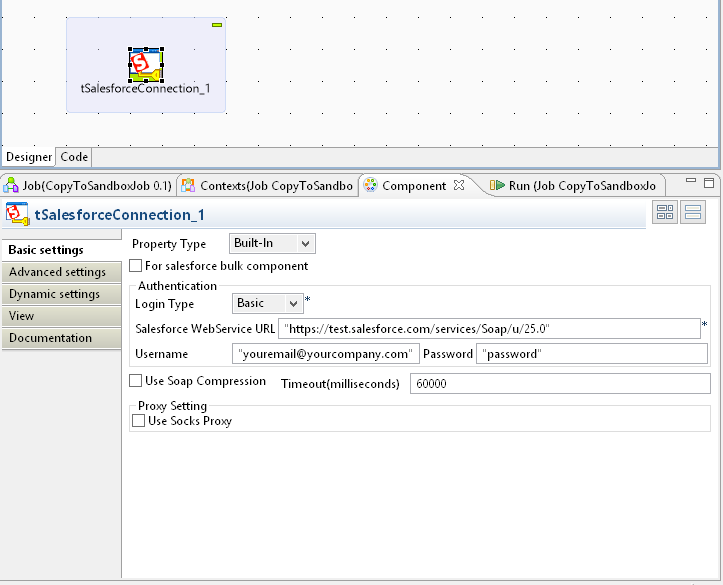
You just need to set three things here:
Username - in double speechmarks
Password - in double speechmarks (sometimes, you may need to append your security token after the password)
Salesforcce WebService URL: for live instances the default value will be correct. For sandboxes rename the first 'login.' part of the URL to be 'test.' as above.
The speechmarks are pretty important. TalenD treats settings a bit like code, so in the component properties, generally anything not in speechmarks is interpreted as a variable name. There are some exceptions to this rule ...
We also need to give this component a friendly name so click on ther View side-tab:

Label format will default to __UNIQUE_NAME__ which tells TalenD to generate a name.
But you can replace Label format with your own text and the component will then be given that name on the canvas. In the screenshot above we've called it 'SalesforceSource'.
So now we've got a Source connection. Add another tSalesforceConnection and repeat the process to create a 'SalesforceTarget',
Next we need to set up a Repository of Meta-data - a description of the Salesforce objects that we are going to be dealing with. TalenD is keen on meta-data, and likes to have schemas centrally defined rather than each component creating it own - although it can do that as well. Getting the meta-data right is especially important with Salesforce Custom Objects.
In the Repository tree on the left of the screen, expand Metadata and then right-click on Salesforce and select Create Salesforce Connection:
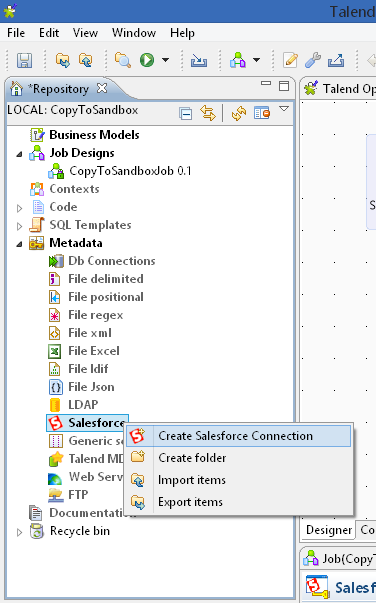
The Meta-data repository cannot re-use the Source and Target connections we created inside the Job, unfortunately, so it needs its own connection:
- In page 1 of the connection wizard, set Name to MetadataConnection and press Next (no speechmarks needed in this wizard)
- On page 2, set Web service url, User name and password. Probably best to connect to the same Salesforce instance as the SalesforceTarget connection defined above. As before, if its a sandbox, replace the 'login.' part of the Web service url with 'test.'
- You can then press the 'Check Login' button to test the connection. If its ok press Finish.
Now right-click on the 'MetadataConnection' node you just created and select 'Retreive Salesforce Modules'
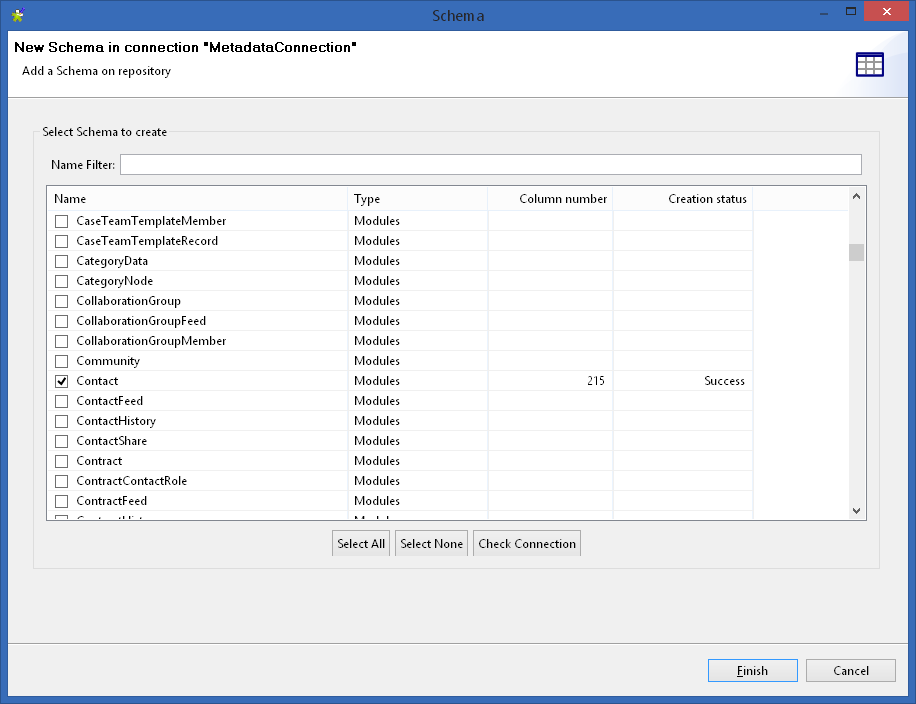
You are then presented with a big list of the objects in the Salesforce Instance that you connected to. You need to tick the box for the objects you want to work with (in this case, Contact, Animal__c and Pet__c). As you tick each box, the Creation Status column will say 'Pending' and then 'Success' as it downloads the metadata for each table.
Some hints: Custom Objects will be at the bottom of the list. You can use the Name filter box to filter the list, however sometimes this seems to cause the 'Finish' button to disable itself, meaning you cannot complete the dialog. So you're probably better off just scrolling through the list, ticking the objects you need.
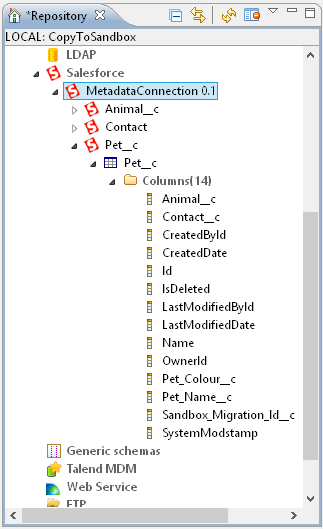
When you've ticked all the objects you need, press Finish. The metadata section will then look something like this:
Digression: Foreign keys, Ids and External Ids
We're going to copy Salesforce data from Source (e.g. live instance) to Target (e.g. a developer sandbox). However, we can't copy it perfectly; there are some read-only fields that we cannot set on the Target:
- Salesforce will generate new 'Id' values in the Target instance. Source Ids will not match Target Ids.
- Autonumber fields (such as Pet Ref in our example) will be regenerated in the Target and so probably wont match the Source
- Other system fields such as Created By/Last Modified By will be generated at the Target.
The Id change is the most serious issue. Remember that we are copying Contact, Animal__c and Pet__c, and that Pet__c has foreign keys to both Contact and Animal__c. In the Source database, those relationships are represented by Id values, but in the Target database all the Id values are going to be different.
We can get around this by making use of External Ids. In our example (and you should consider doing this with whatever object you are using) we have added an External Id to all three objects:
- Sandbox Migration Id (Sandbox_Migration_Id__c) text length 18, External ID
In the source data, this field is blank. But in the target data we will set this field to the original Id of the source row. This will enable us to do two things:
- Import the data using upserts, so that the job can be re-run without creating duplicate data in the target
- Relate the lookup values in Pet__c to Contact and Animal__c, by using the External IDs on Contact and Animal__c.
Note that strictly speaking you only need the'Sandbox Migration Id' fields in the target instance. But it would be a pain to manually add them to a sandbox every time you create a new one. For that reason I'd recommend adding these fields to the live instance. You wont actually use them in the live instance, but every time you generate a Sandbox the fields will be there ready to be used.
External Ids can be a bit mind-bending but it should be clearer as we work through the example:
Building a Subjob to transfer data
Here we're going to use a tSalesforceInput component, a tSalesforceOutput component and a tMap component to transfer the Animal__c data from Source to Target:
Drag a tSalesforceInput component from the Palette on the right over to the canvas. "tSalesforceInput" here means 'input data into the Talend job from Salesforce'.
There are lots of different settings on the tSalesforceInput component. Here's what we need to set:
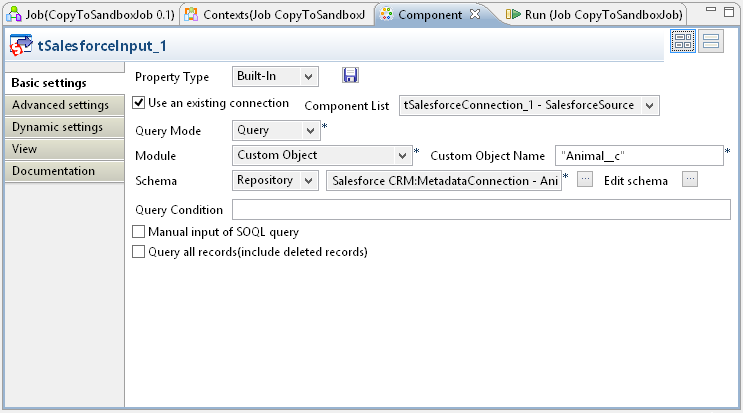
- Check the "Use an existing connection" checkbox. The login fields will disappear and be replaced by a picklist that lets you choose from the tSalesforceConnection objects already on the canvas. We want to choose the 'SalesforceSource' one.
- Leave 'Query Mode' as 'Query'
- The 'Module' field lists the standard Salesforce objects. Scroll right to the bottom of the list and choose 'Custom Object'. A new textbox 'Custom Object Name' will appear, in which we want to type "Animal__c" (with speechmarks).
- Now the tSalesforceInput component knows what object we want to input. But it also needs to know the schema:
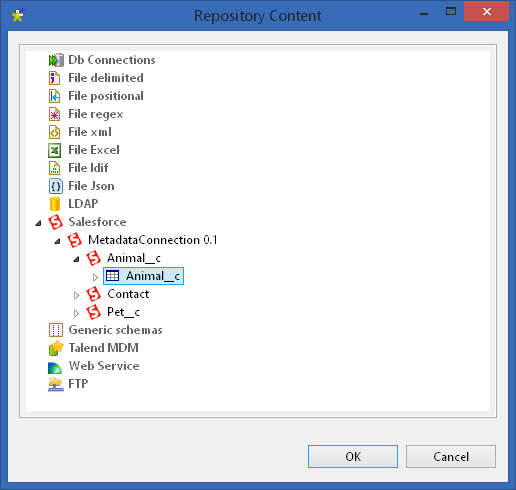
- Change the 'schema' picklist from 'Built-in' to 'Repository'. A textbox and an ellipsis button will appear to the right of the picklist. Press the ellipsis button and you will get a dialog called "Repository Content". Expand the Salesforce node and drill down into the tree until you get to the Animal__c table icon:
- Next we want to clear the Query Condition (we want to transfer all the Animal__c rows). So set Query Condition to blank.
- Your settings should now look like this:
- Finally we'd better give this component a different name. Switch to the view tab of the settings and replace Label format "__UNIQUE__NAME__" with something like "InputAnimal"
Next we need to configure the tSalesforceOutput component:
Drag a tSalesforceOutput onto the canvas (its output as in 'output from the talend job into Salesforce'). We need to set its properies like so:
- As with the input component, check the 'Use an existing connection' checkbox and select a connection, this time the SalesforceTarget one
- Change 'Action' to 'Upsert'. We're going to use Upserts everywhere, so that the job can be re-run as much as we want during testing. An 'Upsert Key Column' picklist will appear, but it will be empty - we'll come back to that.
- In the Module picklist, as with the Input component, scroll to the bottom and select 'Custom object'. Then type "Animal__c" (with speechmarks) in the box that appears.
- For Schema choose "Repository" and then (as with the Input component) press the ellipsis button and choose the Animal__c table from the Repository Contect dialog (see screenshot above).
- Switch to the View tab and set Label format to something like "OutputAnimal"
- Upsert Key Column will have to remain blank for now, so the properties should look like this:

We need to adjust the schema for this output component - by default it will try to set all fields of the object in Salesforce, but some of them (like 'Id') are read only, which will cause an error. So:
- Click on the 'edit schema' ellipsis button
- A dialog will appear with three options: View schema, Change to built-in property, Update repository connection. Leave it at "View schema" and press OK
- You will then see a 'Schema of OutputAnimal' dialog listing all the fields. Each one has a 'Use' tickbox. We want to untick the read-only/system fields, like so:
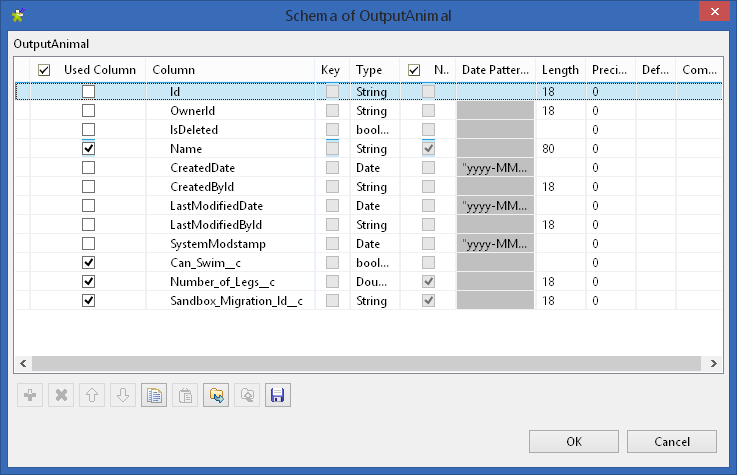
- Then press OK.
- Out Output Component is now down. Mostly. Except for Upsert Key Column...
Now we are going to add a tMap component which will join the input and output:
- In the palette on the right, go to the 'Processing' folder and drag a tMap component onto the canvas. Try and put it between the Input and Outout components. Its default name will become 'tMap_1'
- Right-click on the 'InputAnimal' component and start dragging ... you should see a line coming from the component to your mouse cursor. Drag your cursor to the 'tMap_1' component and then release the button. InputAnimal should now be connected to tMap_1:

- If you can't get the right-click-and-drag to work, the other option is to right click on InputAnimal and select "Row -> Main" from the top of the right-click menu. You will then be in 'drag a line' mode and can go and click on tMap_1 to join the two components together.
- Now we right click on tMap_1 and drag the connecting line to the 'OutputAnimal' component. This time a dialog will appear; TalenD wants us to name this new connection.
- Type something like 'MapAnimalOut' (you will notice the unhelpful 'input is invalid' warning will disappear once you type something) and press OK.
- You will now get another dialog - "Do you want to get the schema of the target component?". Press Yes. What this means is, the tMap output will use the schema of the OutputAnimal component that you connected it to.
We now have Input, tMap and Ouput connected like this:
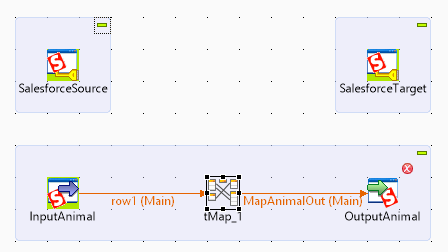
The light blue box that has appeared around the connected components is called a Subjob. You can have many Subjobs within a Job. The little red X above the OutputAnimal component is there because we still havent filled in the 'Upsert Key Column'. We will get round to it.
Now double click on the 'tMap_1' component and a big mapping dialog will appear: Here's how it looks before we fill anything in:

You can do a lot with this tMap component. The input is on the left - it will have picked up the schema from the 'InputAnimal' component. The output on the right has fewer fields because we adjusted the 'OutputAnimal' schema to remove the read-only/system fields. More details of the schemas are shown at the bottom. This dialog will let us map input fields to output fields, but it can also do lots of other things, like formulas, multiple outputs and so on.
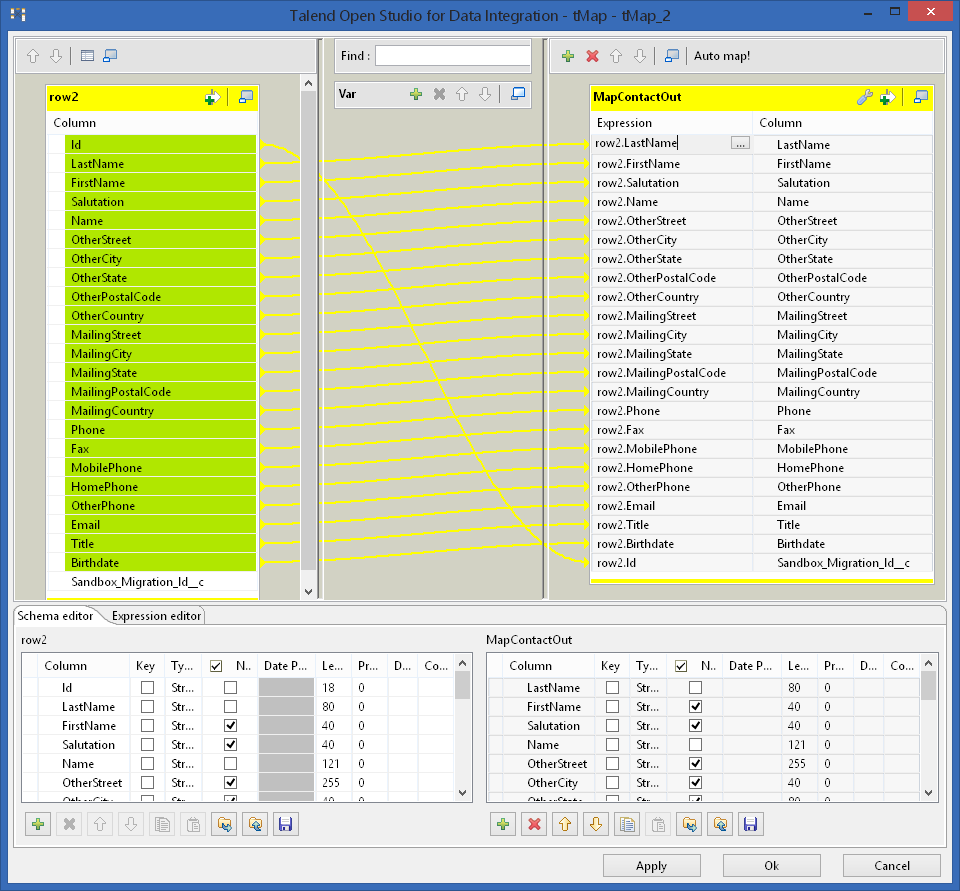
We want to set the mapping as follows:
- Press the 'Auto-map!' button at the top-right. This will map fields with matching names together. You'll see a bunch of yellow mapping lines appear going from left to right.
- The default guess of Auto-map is right for more fields, but not for Sandbox_Migration_Id__c (see 'Digression: Foreign keys, Ids and External Ids', above). We want to map Id from the left to Sandbox_Migration_Id__c on the right. Unfortunately, clicking on the yellow lines doesn't give you a way of deleting them. To remove a mapping we must edit the 'Expression' column in the output grid on the right hand side.
- Click on the cell that is in the 'Expression' column for the 'Sandbox_Migration_Id__c' field in the MapAnimalOut grid. The cell will become editable - remove the text that is there (row1.Sandbox_Migration_Id__c) so that the cell is blank. The yellow line leading to that field will then disappear.
- Now drag the 'Id' field from the input grid on the left to that same cell on the right (that is now blank). You should then get a yellow arrow from 'Id' on the left to 'Sandbox_Migration_Id__c' on the right.
- The other way to acheive this is to type 'row1.Id' into the blank cell.
- Your mapping should now look like this:
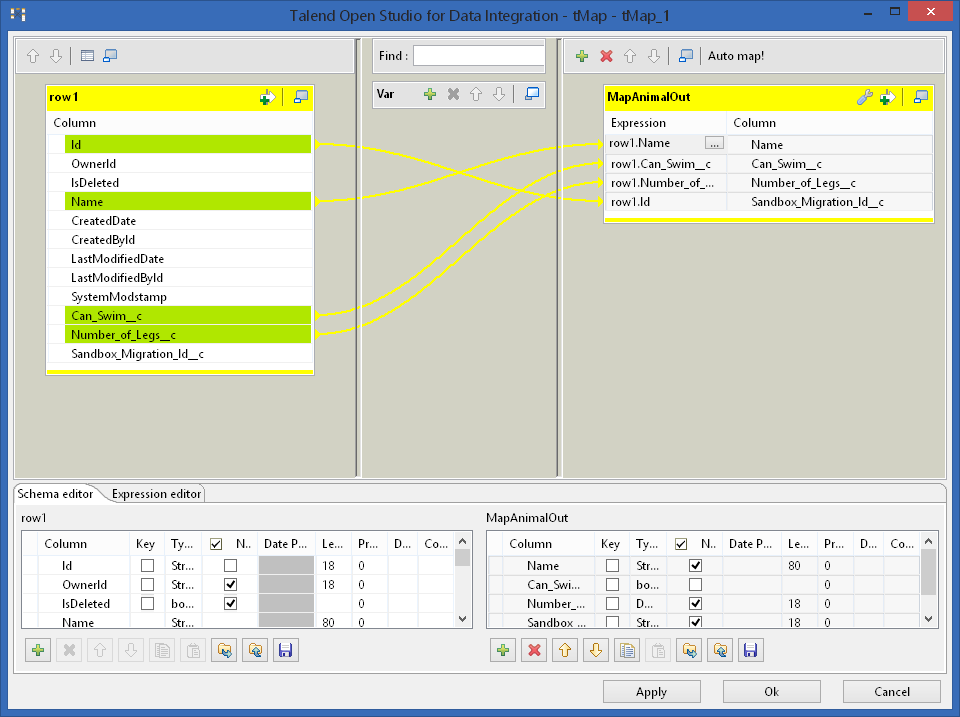
- In which case press OK to close the mapping dialog.
Now that the output component 'OutputAnimal' is all connected up, we can set the Upsert Key Column that we had to skip earlier:
- Double click on 'OutputAnimal'
- Set 'Upsert Key Column' to 'Sandbox_Migration_Id__c'
- Everything else on that component should be OK because we did it earlier.
This is probably a good time to save the project - press the Save icon in the TalenD menu, if you haven't been doing that out of habit anyway.
First run - transferring data for a single object
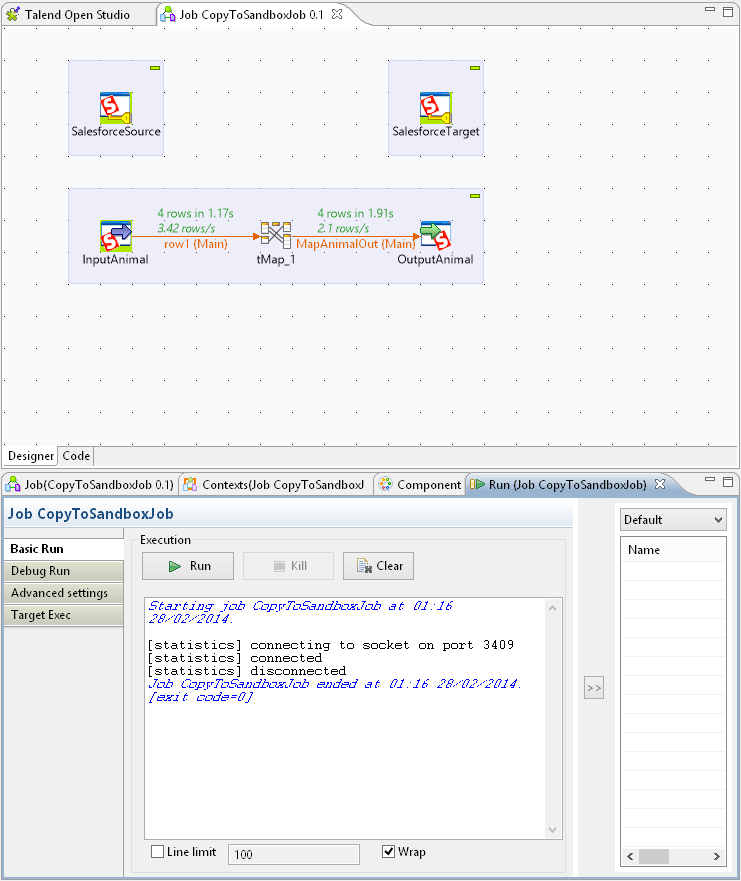
We're now ready to run the thing, and what that should achieve is copying all Animal__c data from Source to Target, mapping the Source Ids into the Target 'Sandbox_Migration_Id__c' field along the way.
To run the project, switch to the 'Run Job' tab at the bottom of the screen and press the big Run button.
Before if runs, TalenD will show a 'Building Job' progress bar. What its actually doing here is taking the job and compiling it into a stand-alone Java program that you could potentially run separately. TalenD is based partially upon the Eclipse Java IDE, and so it is able to build programs. We're not really interested in that ability right now, we just want to run it. But its quite impressive.
The job will then run. If it all goes well, you'll see row counts and data transfer rates appear on the connecting arrows, blue before running and green when finished. You'll also get a few messages in the Run tab about statistics:
If anything goes wrong, you'll get red error warnings on the canvas, and detailed error messages in the run tab. If it does fail, check the following:
- Are your Salesforce credentials in SalesforceSource and SalesforceTarget correct?
- Did you edit the OutputAnimal schema to remove the read-only/system fields? (see above)
- Did you set 'Upsert Key Column' on the OutputAnimal schema? (see above)
Now, more of the same, slightly different
After much step-by-step work we now have one table being transferred. Now we want to add the other two for our example - Contact and Pet__c. This will largely mean repeating the steps above, but with some differences.
To transfer Contact, drag a tSalesforceInput component onto the canvas and set its properties as follows:
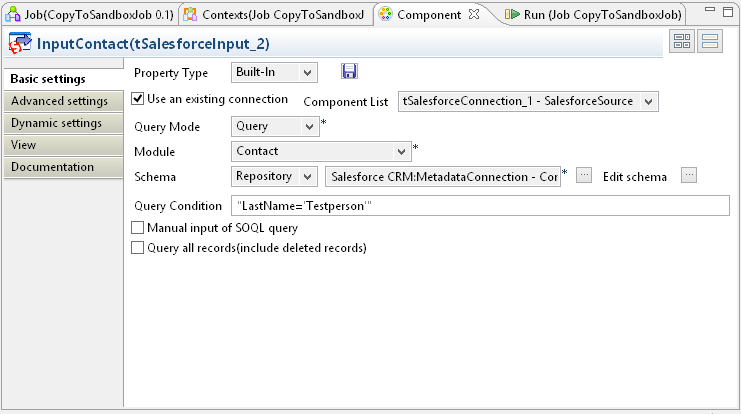
That is, mostly the same as 'InputAnimal', but:
- For 'Module' we can select 'Contact' from the picklist because its a standard Salesforce object rather than a custom one
- In our example, we want to filter the Contacts from the source data, so here we have a Query Condition of "LastName = 'Testperson'" (with speechmarks)
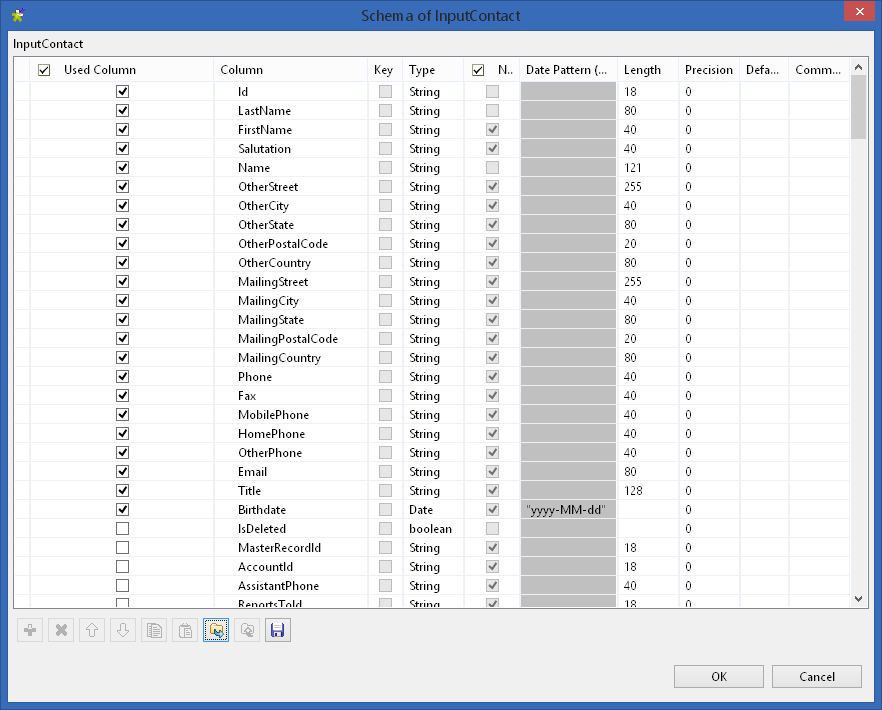
- Contact can have a lot of fields so you may want to use the 'Edit Schema' button to untick 'Use' for some of the columns so that TalenD does not read them from Salesforce. That makes the mapping a bit easier to handle. It also reduces the number of relationship/lookup fields to might have to deal with. Here's the columns I left ticked on the Contact input schema for this example:
Then drag a tSalesforceOutput component on and set its properties like this:

As with Animal, we'll have to come back and set Upset Key Column later.
We need to press the 'Edit schema' button and untick 'use' for any read only/system columns. And for any other columns we're not interested in. Here's the fields I'm using in this example:

To keep this example simple, we're not including any Lookup/Parent-Child fields. Specifically, we're not trying to fill in the Account for the Contact.
We are including the Sandbox_Migration_Id__c field in the Contact Output schema - this is important for the upserts and Pet__c to Contact relationship to work.
As before, add a tMap to the canvas, link the Input to it, and then link the tMap to the output. Then set the mapping as follows:
That is - auto-map everything, except for Id in the Input which should map to Sandbox_Migration_Id__c in the output.
The final thing to get Contact working is to go back to the OutputContact component and set the'Upsert Key Column' to 'Sandbox_Migration_Id__c'.
Second run - transferring data for two objects
If you run the job again, you should see something like this:

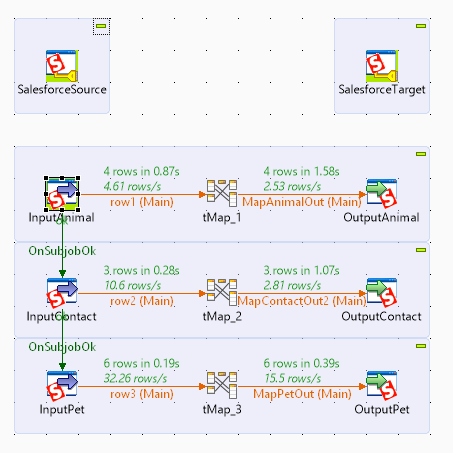
Note that we now have two Subjobs in our TalenD job. TalenD will run them in whatever order it likes (usually, the one added first runs first). Thats OK so far, because Animal__c and Contact are not directly related. However in the next stage we're adding a third Subjob and we will need to tell TalenD how the Subjobs depend on each other.
Adding a third object with lookups to the other two
Now we want to add the Pet__c object. Pet__c has lookup fields to both Contact and Animal__c, and so there will be a few extra settings this time.
The tSalesforceInput component for Pet__c is much like the one for Animal__c:
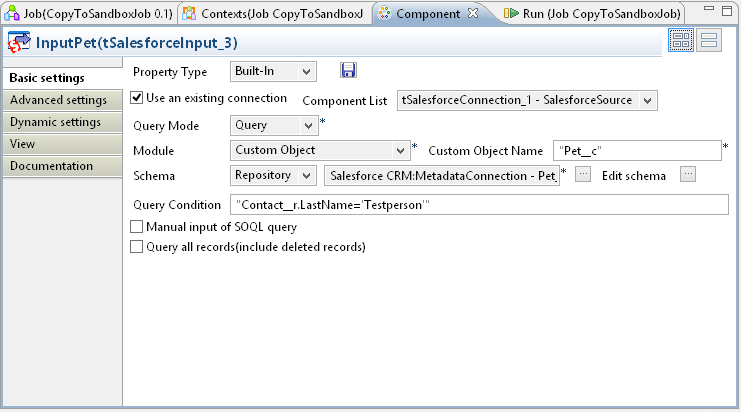
The one difference is that we want to filter Pet__c, using the same Contact filter. So the Query Condition "Contact__r.LastName='Testperson'" (with speechmarks) achieves this by filtering on the parent Contact's fields.
The tSalesforceOutput component for Pet__c is also much like the one for Animal__c:

As ever, we need to come back and set 'Upsert Key Column' in a minute. We also need to do some things on the Advanced Settings tab to get the relationships working. The output schema for Pet__c must be edited to skip all system/read-only fields, like so:

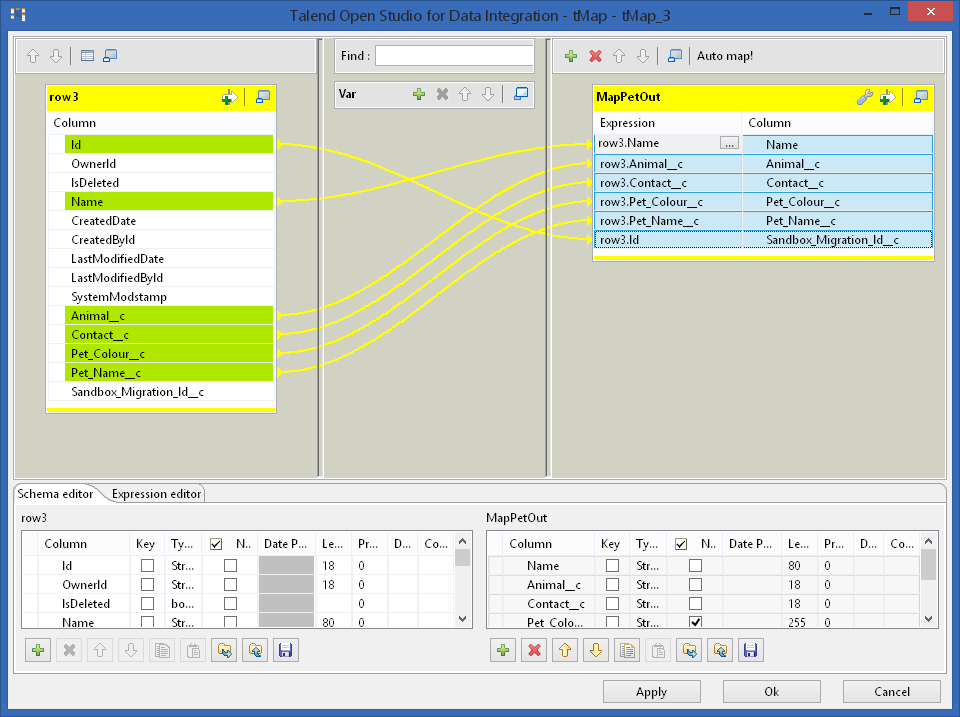
The tMap component for Pet has the usual mapping - everything automapped except for Id to Sandbox_Migration_Id__c:
The complicated bit, with Pet__c, is getting the relationships to Contact and Animal__c to work. To do this we have to go to the Advanced Settings tab of the OutputPet component, and set the 'Relationship mapping for upsert' grid like this:
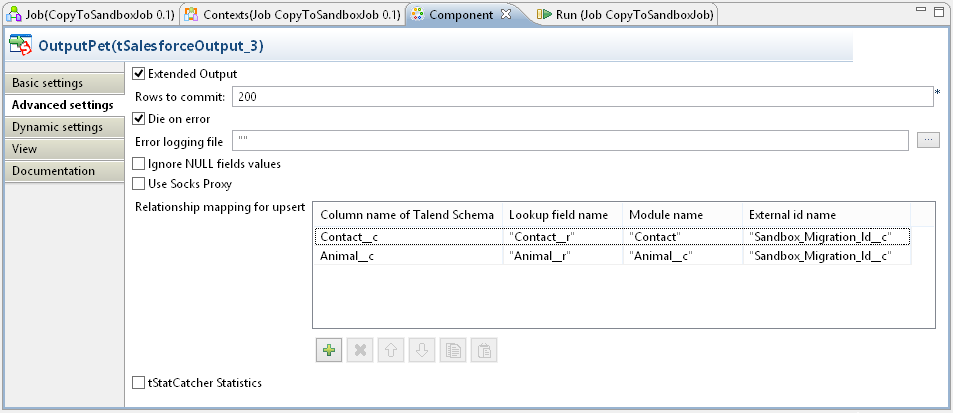
The 'Relationship mapping for upsert' grid is pretty confusing to fill in, the first column is a picklist but the other three columns are just text fields where you have to type the field names (hence the speechmarks in those columns).
What these two rows in the grid are saying is:
- The Pet__c data has a Contact__c column. Follow the "Contact__r" relationship from Pet__c to Contact and then match the value to the "Contact.Sandbox_Migration_Id__c" column.
- The Pet__c data has an Animal__c column. Follow the "Animal__r" relationship from Pet__c to Animal__c and then matchthe value to the "Animal__c.Sandbox_Migration_Id__c" column.
Two hints for this grid:
- Any fieldnames you type in need to be wrapped in speechmarks (except the first column which is a picklist)
- Relationships names from custom objects to other objects generally end in '__r'. However relationships between standard objects do not have the '__r' suffix.
Setting the Subjob order
One more thing we need to do is tell TalenD to only run the Pet Subjob after the other two Subjobs:
- Right click on the InputAnimal component and select 'Trigger -> On Subjob OK' from the menu.
- You will now have a line going to your mouse pointer. Click on the InputContact component.
- TalenD now knows to only run the Contact SubJob if the Animal Subjob has finished with no errors.
- Right click on the InputContact component and select 'Trigger -> On Subjob OK' from the menu.
- Click on the InputPet component to link the line to it.
- TalenD now knows to only run the Pet Subjob if the Contact Subjob has finished with no errors.
Third run - transferring data for three related objects
Now that all three objects are set up, we can run the job again. If it all works it should look like this:
Summary
Copying a sample of Live data into Developer sandboxes so that you have something to work with is a common problem in Salesforce. There are various tools for helping with this, including several free ETL tools. TalenD is a whopping big Java ETL that can do the job. When you transfer data, some values get freshly generated, including object Ids. This means care has to be taken with relationships between objects to make those relationships transfer properly. The approach taken above with 'Sandbox_Migration_Id__c' fields is one way of tackling this.
Building an ETL package like this to populate a Sandbox takes a bit of effort, but once you have done it you can re-use it again and again whenever you refresh a sandbox. Just changing the credentials in the 'SalesforceTarget' component is all you need to do to point the package at a different sandbox.